Let's Connect!

...

Saturday, October 8, 2011

Travel Laundry Duties 10.8.11

To many of us, laundry is a four-letter word. We hate doing it at home and wouldn’t dream of doing it when we didn’t have to. Even though I can’t stand to do laundry every week (mostly, I just hate to hang it up and put it away), I always tell people to do it while on vacation. Am I just being a jerk and trying to ruin your trip? Not at all. I actually don’t mind washing clothes when I travel – probably because there is so little of it – and it helps me save money, too. And no, I’m not just telling you that to trick you. I take time out of my fun to wind down and clean some clothes every time I go on vacation. Don’t believe me? All these photos are my own.


So, how does it save money? Well, by taking less and doing laundry, I am able to pack all our clothing in a carry-on and not have to pay checked baggage fees. This can keep up to $35 in your pocket ($70 if you figure in having to check it on the way back, too) or more if you are a chronic overpacker and have to pay oversize and/or overweight fees any time you travel. Those fees can be up to $100 each way, on top of regular baggage fees, making it cost more than your airline ticket.

Do they have the kitchen sink in there, too?
We were just at the airport coming home last week and I noticed that 90% of the people checking in had several bags and most were HUGE. Either all these travelers thought they needed parkas and snowsuits to leave Hawaii, bought way too much stuff or have no idea how to pack for a trip that doesn’t require moving to another country. I mean, there are people every day that travel the globe with just a small bag full of belongings and do just fine. Why do these other people need to pack bags that wouldn’t fit in my car? I’m sure there are plenty of reasons why, but one thing is for sure, almost all of these travelers could have taken much less and been just fine.

Maybe they don’t know they can save so much money by packing fewer clothes and doing a load of wash once or twice while they are gone. There is a reason I tell you every time I post about packing light that you should mix and match your clothing. When everything coordinates, you can make more outfit combinations and take only a few key pieces.
 
See my sheet right on top of my laundry!

You don’t have to take up space in your 3-1-1 bag with laundry detergent either. One of my favorite products that I always have in my travel bag is Purex 3-in-1 sheets. They pack flat and are solid, so you can put them in any pocket in your bag. They are a detergent, fabric softener and dryer sheet in one, also, so you can use them in the washer, then transfer it with all your clothes directly to the dryer (if you are using it). It makes doing laundry way easy and it comes in scented and unscented varieties, in case, like me, you have sensitive skin.

Yup, we are having a GOOD TIME! (London)
You can always buy detergent anywhere you go, too, though you may pay more if you are in a touristy destination or have to try a new brand if you are going to a foreign country. Woolite has some great one-use packets that can be used in the sink or the washing machine. The same goes for Tide and other brand-name detergents. You can usually find them in the trial-size section of your discount or grocery store. I like to buy these types of things at Target.

Sometimes you will find yourself in a destination where there are no laundry facilities nearby or on-site (or it just isn’t cost-effective), and these are the times you will be washing your clothes in the bathroom sink or shower. If you only have powdered detergent with you, don’t worry. You CAN use it, but you can also use bar soap or shampoo to do it. If you know ahead of time that you will need to hand wash and can prepare for it, any of the packets above will work, but you can also purchase detergent leaves, like the ones from Travelon that you can purchase many places online. You will have to spend extra time rinsing the suds out and then wringing the clothing out, like a washer would do, or your clothes will take forever to dry. One of the best tips for getting as much water out of the clothes as possible is to squish them out real well and then roll up in a dry towel and stomp on it, so the water seeps into the towel.


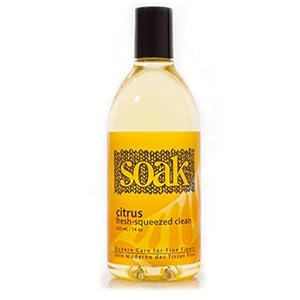
A newly discovered (by me) product on the market that makes hand-washing a breeze is Soak Wash. It’s awesome because it requires no rinsing. I don’t know quite how it works, but it does. You can wash everything, wring it out, let dry and wear. It was developed for delicate items, like lingerie, that don’t hold up well when you scrunch it up or put it in the washing machine. Now, it’s a wonderful companion for travelers, because it makes the (sometimes tedious) task of hand-washing really easy, because the worst part of sink washing is rinsing the clothes before you can squish out the water and hang up. It can make it feel like it takes forever. Unfortunately, I don’t have any pictures of me hand-washing clothes on the occasions I’ve had to, but trust me when I say that I have done this more than a few times and so has Eric. We did discover that you can multitask by bringing items with you into the shower and doing some scrubbing in between shampooing and conditioning. Otherwise, we just take a little time to do it in the evening while we’re winding down from a full travel day.


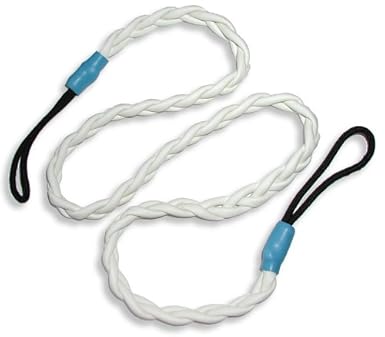
For those of you who DO have to hand-wash, you may want to purchase a laundry line. Not all rooms have hangers, a line in the shower or anywhere useful to hang your clothing, so my  travel bag also includes a durable braided rubber line. It doesn't require accessories, because you can easily hang the clothes by using the braids to hold them on. It stretches to 7 feet long and has velcro loops on each end, which makes it easy to hang on pretty much anything. Avoid the laundry lines with the suction cups, because 9 times out of 10, you will wake up to all your clean clothes in a pile on the floor, because one or both sides have un-sucked. Plus, you can only use them in the bathroom (when they work). The looped ends give you much more freedom and can hang out of the way of frequently used areas in your room.

There are my Purex sheets in one of the pockets
One of my other favorite travel accessories is a pop-up mesh laundry basket, like the EZ FoldR from Baijer. It folds up when not in use and then it pops open to hold a large amount of clothing. We use it everywhere as a hamper and then when it’s full (or we are running out of clean items), we grab it and do a load. The one we have is awesome, because it has wide, reinforced handles and 4 pockets, where you can stash your quarters, detergent and anything else you need (like a game or book to keep you busy). It is easy to carry whether your clothes are wet or dry. I like to keep spare quarters in mine at all times, so I don't have to worry about going to get change, too. If I don't need them for the washers, I can always use them to get a snack or soda from the vending machines!

During laundry time, Eric took advantage of the pool and I caught up on some reading!

I hope this helps you think of laundry as more of a travel adventure than a chore and it encourages you to bring less. While you may have to take an hour out of your whole trip to deal with dirty clothes, it really is worth it. We also discovered that if you travel with clothing specific for travel – lightweight, quick-drying clothing  you won't spend much time waiting for the dryer (our load was done in about 20 minutes) or will wake up to completely dry clothing you can wear! Just think of what you could spend that baggage fee money on while you're ON your trip.

Thursday, October 6, 2011

Review: Emerson Carry-On from Eagle Creek

In case you haven’t figured it out by now, I’m a bagaholic. Yes, I love bags of every size and style that can be used for anything from toting lunches to golf clubs. Maybe it’s because I find bags so versatile and I also like to carry things, but it’s rare that I come across a bag that is so great I want to tell everyone else about it. But that’s just what happened when a little something called the Emerson from Eagle Creek arrived on my door step.  

Having already admitted that I have an unhealthy bag problem, you can imagine how many carry-on bags, purses, overnight bags, wristlets and cross-body bags I own. I mean, I still have a suitcase and a rolling garment bag that must be checked that I don’t use anymore, but refuse to give up. So, why add one more to the collection? Well, the simple answer is: once you have the Emerson, you will see no reason to keep many of those other bags!


If you think I’m exaggerating, I am not. The Emerson is the perfect companion bag for the airplane (or the gym or sleepovers or an on-the-go office or even someone with a baby). Not only is the bag roomy, it will hold your 17″ laptop and all the essentials you need in the air. Having just come home from a trip, I immediately unpacked the bag I brought with me and stuffed everything into the Emerson to see how well it would fit and if I could get to it all. Now, I don’t bring my huge laptop with me, but as you can see, it fits in the padded compartment with room to spare! I do travel with my netbook and iPad, which both fit nicely in the same compartment side by side, and then my Kindle, iPod Touch, snacks, a small purse, travel games for the plane, a pad of paper, a bottle of water, a magazine or two (or ones I’ve taken from the plane for later), some pens and my husband’s Nintendo DS. Look at all the stuff in the bag and there is still room for more!


I love all the pockets and the wide bottom, too. It has fantastic metal zippers and accents, and the bottom is lined and has feet to keep it from getting dirty. Not only that, the shape of the bag makes it easy to see everything and remove items. The bag is stylish, comes in great colors (thank you to Eagle Creek for somehow knowing that red would go with every travel thing I own) and has wonderfully wide straps that are comfortable for carrying on your shoulder. There is even a removable longer, adjustable strap to carry it cross-body.


Keep all your travel docs and your passport in the front or back zippered pocket and then slip the bag onto your larger carry-on handle. To me, that is one of the best features that aren’t included in many boarding bags anymore. Being able to stack your bags is great for navigating through the airport and also frees up your arm for your baby, phone or latte!


Okay, so I tried some other combinations for this bag as well:
  • I found you could easily use it for a work bag. Hello! A 17″ laptop fits in there! You have pockets in there for your cell phone, pens, paperwork and anything else you need for doing work on-the-go.
  • Carry your scrapbooking project with you!
  • Put a change of clothes, some shoes and toiletries in it and use it for an overnight or weekend bag. (You can even use it with Eagle Creek’s Pack-It™ system to pack more in there.)
  • Keep your gym clothes, towel and blow dryer in it for workouts.
  • Got a new baby? Cram this thing full of diapers, wipes, bottles, changing pad, toys and spare clothing! Mom and Dad look great carrying this bag and once you don’t need a baby bag anymore, it has so many more uses!

Now that you know about the awesomeness of this bag, let’s talk about specifics. With dimensions of 17.5″ x 12″ x 5.5″ this bag easily holds all your necessities and slides under the airplane seat with room to spare. You’ll look better carrying it, too (in MY opinion). It’s backed by Eagle Creek’s lifetime warranty. If your zippers break or the seams come undone, simply send it back to Eagle Creek to get it repaired or replaced by a similar product. See their website for repair information.

Eagle Creek uses the highest grade materials in their products, making them long-lasting and durable. So, not only will you love your bag (or other product), but you can be assured that it will travel with you as long as you are able to travel. It’s great for the environment (less rubbish in landfills) and also for your wallet, because this is the last bag you may ever need to buy. With that kind of guarantee, the $145 price tag doesn’t look so bad. Reduce your cost per use each time you use it over your lifetime!

What more can you say about this bag? Not much, but here are some things you might want to know as well:

What is this bag made of? 420D Helix™-e Tela, 420D Helix Stratus, 600D Helix™-e Astra, Satin (interior).
Available Colors: Black, Dove Stratus (silver) and Rio Red Stratus
Where can you buy it? Look on the Eagle Creek website, where you can also find retailers, both online and off here.


Disclosure: I received the Emerson bag from Eagle Creek in order to write this review, but the opinions are all 100% my own. Thank you again to Eagle Creek for allowing me to tell all my wonderful readers about this amazing bag. Want a review of your product? Find more information here.

Wednesday, October 5, 2011

10 Ways to Stretch Your Budget in Honolulu 10.5.11

Last week I was off to Oahu in Hawaii and we stayed in the Waikiki area. While we saved quite a bit on airfare, our lodgings and even our activities (by using Groupon), there were things that we still had to pay for that could be quite spendy. We planned out some meals (using Groupon for a few) and then winged it the rest of the time. We planned to splurge on a lunch at Morimoto’s, but it turned out to be quite reasonable ($22 for a “lunch set” that included your entrée, a small salad, miso soup and sushi). I know many people love Hawaii or dream of going there. If not for the obscene cost of things, they would have already traveled there. While you can keep an eye out for affordable airfare and hotels, it’s not always easy to save on doing things there, so I’ve put together this list for you that may want to go and not have to pay on your credit cards for the next 5 years.


 1. Take TheBus – At just $2.50 per person, TheBus will take you around the whole island. Cheap way to tour and also get places! You can pick up a bus pass at participating ABC Stores, but I found we didn’t need it and we also walked a lot.


2.    Hit the beach – You’re in Hawaii. No matter where you are, the beach is probably not that far away. Not only is lying on the beach and playing in the water free, it can also be fun! Buy a volleyball or sand bucket and get some exercise or search for buried treasure. Make sure to put on lots of sunscreen and bring it with you for reapplication! That sun is hot.


3.   Check out the Dole Plantation – Sure, it’s touristy and it’s a long ride on TheBus (not such a long drive if you rent a car), but it can take up most of your day. Browse the gift shop, purchase plumeria starts or fresh fruit at the Farmers Market, ride the train, get lost in the maze, eat at the Plantation Grille and learn about Hawaii’s native plants and flowers. Oh yeah! You can even see how pineapples are grown, ship some back home and eat lots of Dole Whip! Extra tip: You get a lot of food in the platters for little money, so there is more than one of you, split a plate.

All this for only $9!
4.    Window shop – There are lots of shops in Honolulu/Waikiki. While you may not want to buy anything, it’s still fun to look. From the giant Crocs store to smaller art shops, there are things to look at for weeks on end. Here’s another tip that I can give you: See a print you like, but the price tag makes you cry? Look to see if they have a calendar of the artist’s work. If they do, pick that up for a fraction of the price and get 12 pictures for the price of one. Once in a frame, no one will be able to tell that it isn’t a print, and you can switch it out anytime you like for one of the other 11 reproductions you have.


5.    Shop the International Market Place – While it’s not so “international”, there can be some fun stuff to be found in the market. From plumeria barrettes and “Hawaiian” shirts that you can find everywhere to original artwork and things like caps with wooden bills, you can get lost in the market for hours on end. If you do plan to buy, practice your haggling skills and then head up to the 2nd “floor” in above the real shops and smoothie café to mail items home at the post office. Aside from checking out funky handmade items and other things, you can watch free shows every day, too!

Look at that turtle!
6.    Snorkel for cheap – If you are a snorkeler and don’t need to go with a guide or a group, purchase your own mask and snorkel for around $6 and hit the beaches and look underwater for free. There are people everywhere who can tell you the best places to go. One of those places is Hanauma Bay. While not free, it’s only $5 per person for a day pass. You can take the bus or drive (park for $1) and then head down to the beach, where they have changing rooms, food vendors and more, including some of the best snorkeling on the island.

That's Diamond Head back there.
7.    Hike Diamond Head – If you want a fantastic view of Honolulu and the beaches, strap on some good walking shoes, grab your water and hike to the top of Diamond Head. It’s free and a popular activity.

What an amazing view
8.   Take a day tour – Sure, these can cost around $60 per person, but you are entertained for the whole day, meet some cool people from around the world and learn so much from the guide. I recommend VIP Transportation tours. Request Earl as a driver, because he will take that tour van to places others won’t even dare…and it’s so worth it!

9.    Drive around the island – If a tour isn’t your cup of tea, then rent a car for the day and drive the circle island loop on your own, stopping at roadside fruit stands, all kinds of beaches and more.


10.   Learn to hula – There are so many places where you can learn to hula for free. It’s fun, great exercise and easy for all ages. Shake your hips, wave your arms and mesmerize the masses!
 
Other tips to consider:
·     Pick up the coupon booklets that are on the streets, in hotel lobbies and even in the airport to save dollars off on activities, entertainment and shopping. You can also get free gifts (with purchase), appetizers and desserts with some coupons.


     ·You can save money by not buying a bus pass. A four-day pass is $25, but you would have to ride the bus more than 10 times in those four days to make it worth your while. A transfer is good for 2 ½ hours (or longer, depending on your driver), which means most places you go, you can return for free.
     ·Stop by Mac 24/7 for pancakes. For $15, you get the pancake challenge portion size, but you don’t have to take the challenge. Split the flapjacks between two or more. If you splurge for lunch or dinner entrees, they are worth the price. I loved the mahi mahi.


          ·Hit up Tiki’s Grill and Bar on Tuesday for Tiki Taco Tuesday. Their fish tacos are amazingly good and just $2 each on Tuesday!


          ·Use the free Hilo Hattie’s trolley to get to the mall or save bus fare if you are heading to that area.
<!      ·Beware the kitchy merchandise at the ABC Stores. The closer to the center of town you are, the more it seems to cost.


          ·Much of the merchandise at the Dole Plantation is overpriced. A lot of it can be found elsewhere for cheaper, except at the airport. You can also save by taking your purchases with you and mailing it home at the Post Office instead of shipping from there.
          ·Enjoy the best view of Waikiki from the revolving restaurant, Top of Waikiki. While the entrees may be expensive, you can show up for happy hour and get a couple apps (starting at $7). You don’t even have to order any alcohol if you don’t want to.


           ·If, like me, you plan to eat a lot of awesome food, even if it’s all seafood you are going to gain some weight. Everything comes with carbs, carbs and more carbs and it seems that Hawaiians don’t know what a veggie is. Combat the expanding waistline by walking more. Everything is within walking distance in Waikiki. On one occasion we took the bus to a restaurant right outside of Waikiki, but we still had to walk about a quarter of a mile to get there after getting off the bus. On the way back, since we didn’t know the bus schedule, we just walked the whole way back to the room, which was easily two miles. With all the distractions you can find in the city, it’s easy to walk a lot without realizing it.
           ·It’s Hawaii! You don’t need much. Pack a few tops and bottoms, throw your swimsuit and cover-up in the bag and off you go. Do some laundry while you’re there and save even more space in your travel bag to help you pack lighter.
           ·    Book a shuttle to/from the airport. Cheaper than a taxi and more reliable than the bus.
           ·    Rent a condo. It will be much more affordable than a hotel and you can buy food to make instead of dining out all the time. We saved by buying breakfast foods and even though it cost us around $40, that was still cheaper than buying breakfast every morning.

Do you have some other good tips for budget travel to Honolulu, or other cities on Oahu or the other islands?

Aloha!
Pin It button on image hover